Posts Tagged Pedagogy

First steps in SOLO Taxonomy

The SOLO Taxonomy’s power is in its simplicity.  After 6months of implementing it into what we do in Quest (Year 8 integrated Science and Geography) I had a conversation with two year 12 Biology students about how they could improve their written response to HSC questions and released that I was seamlessly describing how they had connected ideas, but they had not extended as the question had ask.  I was explaining this with the simple hand gestures that describe SOLO and realised I had assimilated SOLO into the way I was thinking to the point it was flowing naturally out of me, and what surprised me most was the students grasped what I was saying instantly.

When I first started exploring SOLO Taxonomy I was confused by the terminology and I came to it with the mindset of the complexity of Bloom’s Taxonomy.  I have been a Bloom’s devotee, I believe much of what we have had students doing for so long was low level and not challenging.  Blooms gave some structure to help improve the depth of tasks but I have found Blooms relies on a deep understanding of the verbs used and that often leeds to confusion.  Blooms lacks an underlying framework of what happens when we think and learn.  SOLO on the other hand in its very nature of looking for observably thinking provides the framework that the learning verbs attach to.

Yr_8_Quest__How_has_penicillin_changed_the_world__A_Case_Study_
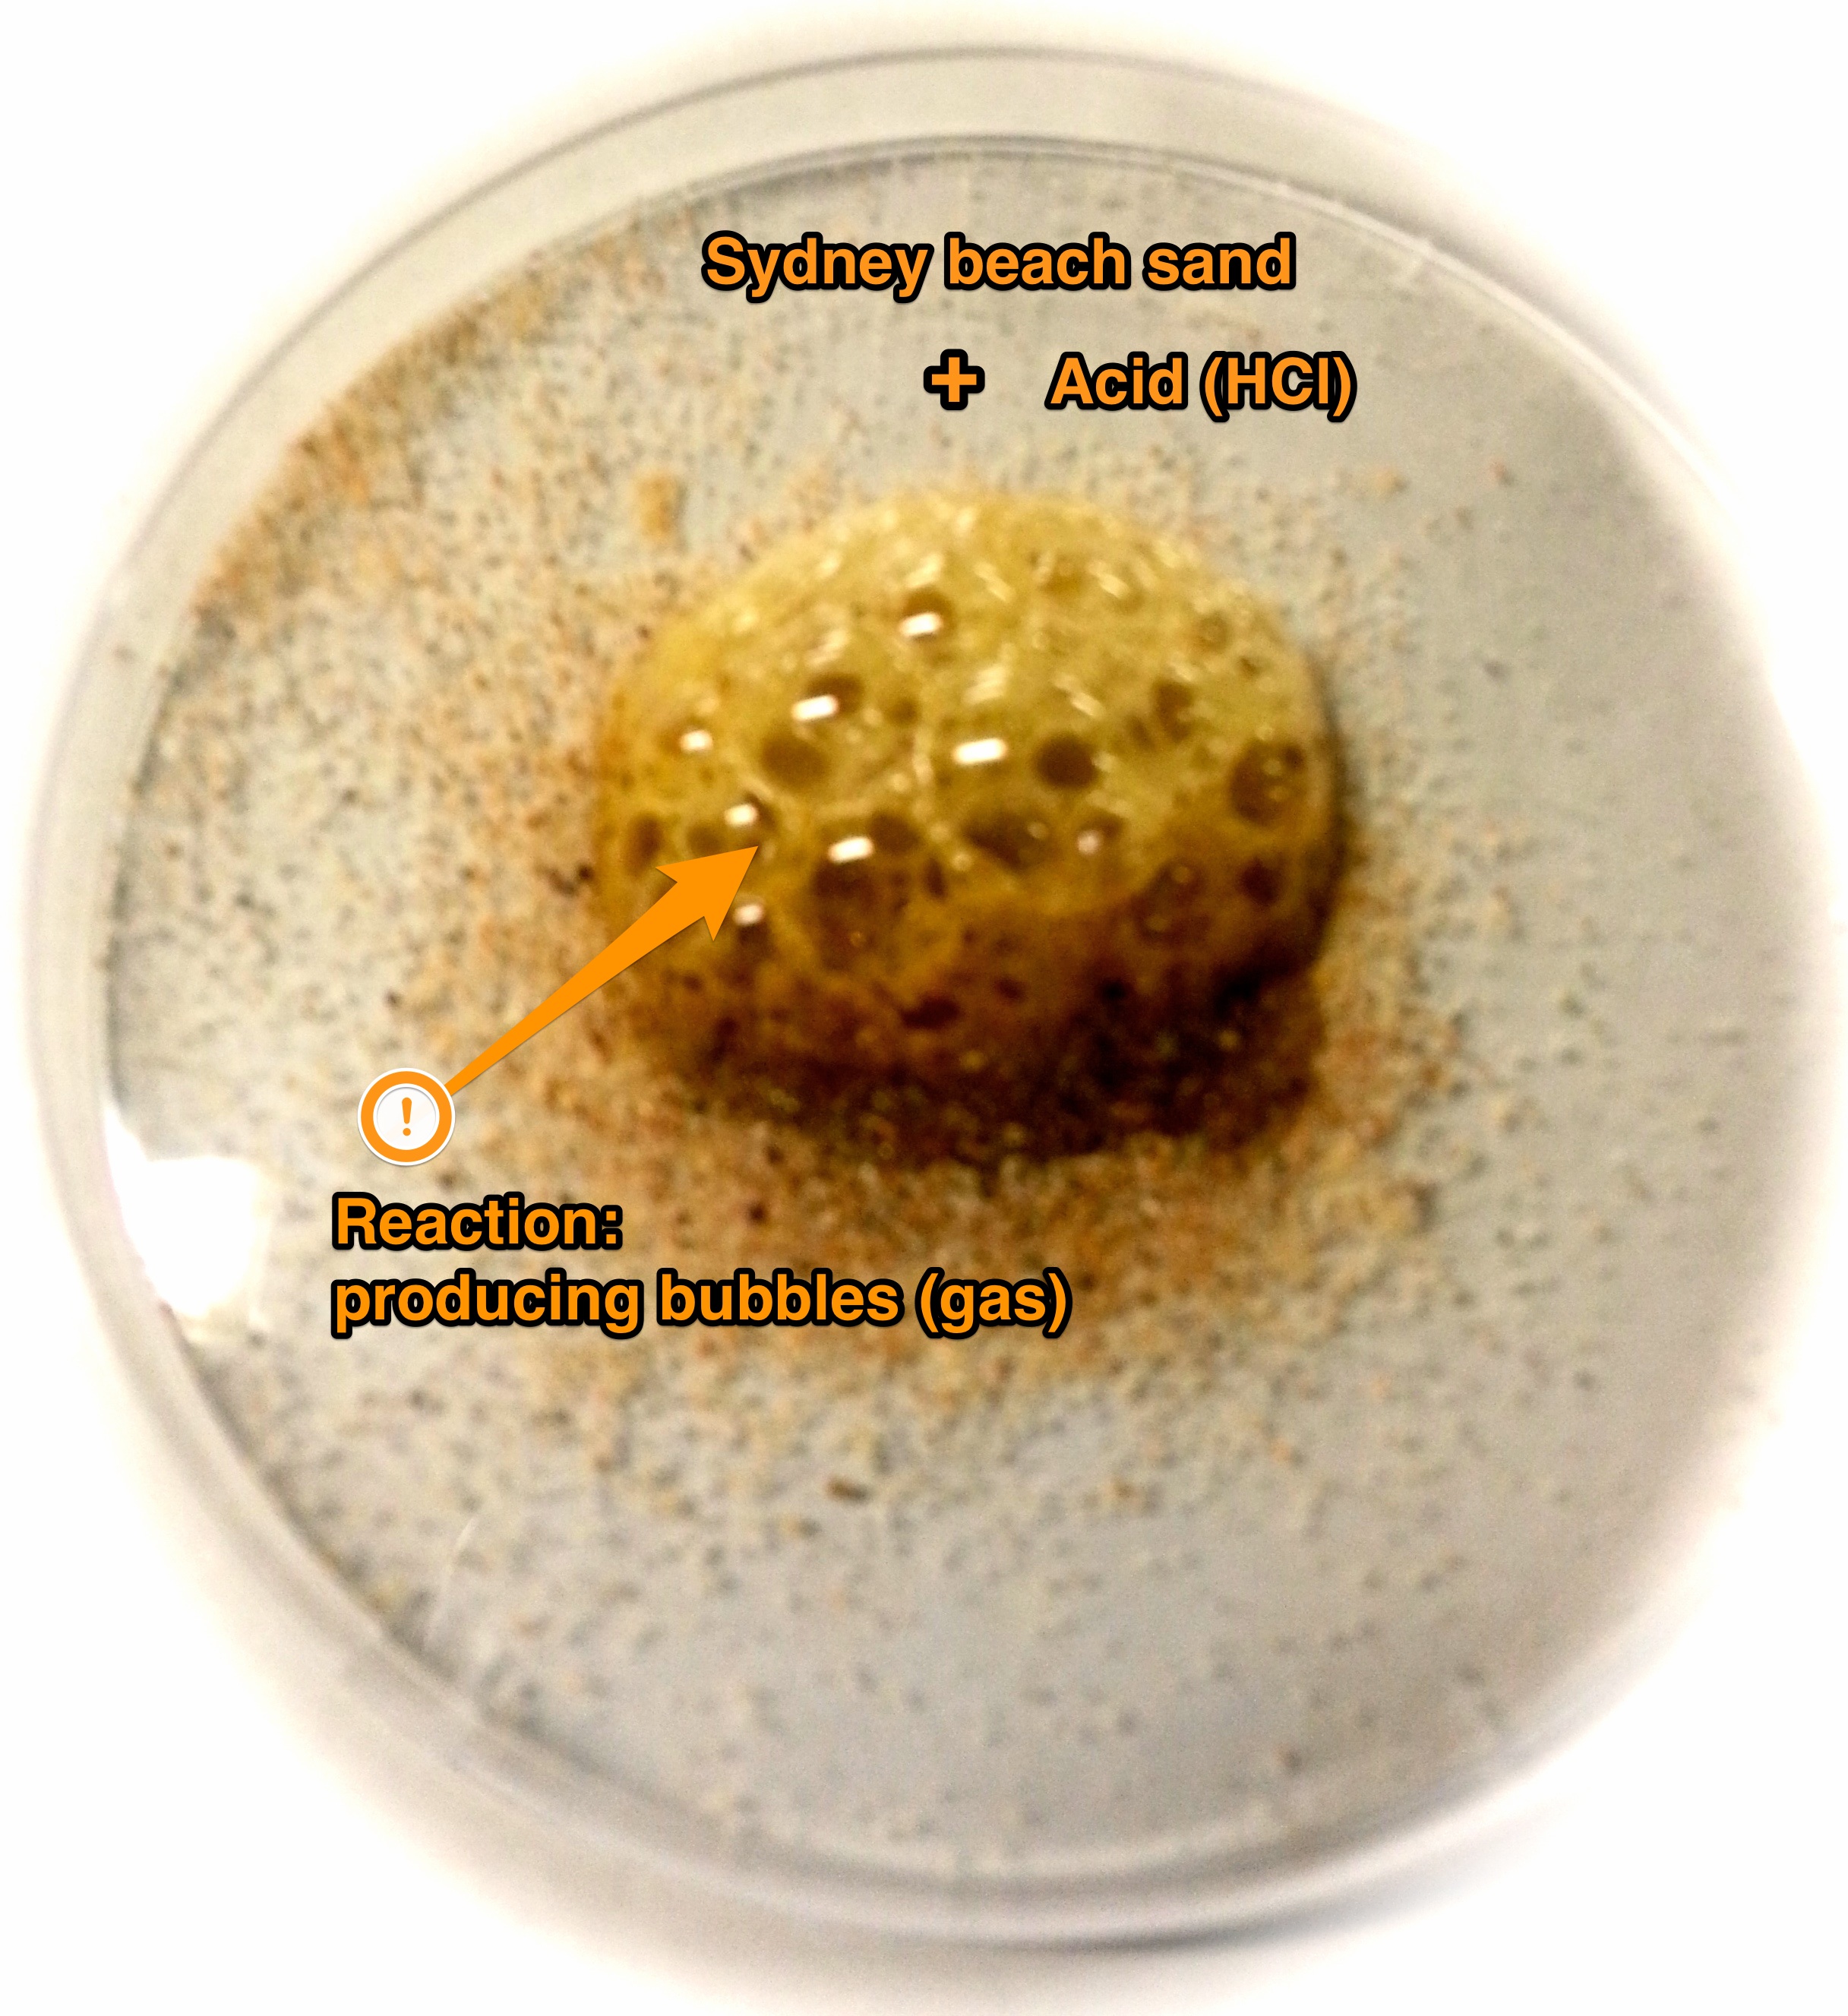
My first steps in introducing SOLO into the lesson preparation for Quest was to describe the SOLO Taxonomy to the team of teachers I work with and create a template using the SOLO symbols that we expected all tasks to aline to (see the image for an example of how it was implemented). We started by only using the last three levels of SOLO (Multistructural, Connected and Extended abstract) in our scaffold and allowed teachers the flexibility of not including all levels if they felt the task could not be pushed into the higher thinking levels. We made extensive use of Pam Hook’s HookED site and the useful tools she makes available. It was stressed that we really wanted the extended tasks to push the students thinking and that they could be seen as ‘extension’ tasks for the brighter students.  In practice I have found that treating these tasks as optional for students or telling capable students to start with the extended tasks has been a helpful differentiation tool for a mix ability class.

Comments (1)

What should learning look like?

I currently have responsibility for a team of teachers implementing an integrated (science & geography) year 8 course.  A large part of the learning that occurs in this course occurs in an open learning space with up to five classes being present at any one time. Our school has a bring your own device policy (BYOD) and all of the learning tasks are available via the online learning portal.

Two question that I have been contemplating as we reprogram this year are what is “the role of the teacher?” and “what should learning tasks look like?” These two questions are interrelated, both effect the other. Neither can be properly answered without a clear idea about what learning should look like.

The role of the teacher in one sense has never changed, that is the teacher is the guide for the learner. Expert teachers have always been a guide, but many have also acted as the font of knowledge that was poured into empty minds.  But students don’t come with empty minds and they lose attention after 7 to 10 minutes of teacher talk. Having all our learning online allowed some teachers to go too far in another direction, allowing students to just get on with it and stepping so far back that they became absent in the minds of some students. This is not new either, it’s just the teacher who set work in a text and left the room.

Good teachers are active in the learning of their students. To be active they need to know ‘the what next’ for each learner. To know the what next, teachers need to have obtained feedback from the learner about what they already know, what is their current understanding or misunderstanding and how big a next step the learner is capable of taking. Teachers need to be good at building relationships with students to build the trust that allows for the honest feedback from student to teacher to occur.

How then do you build tasks that help facilitate teachers to be active participants learning?

One answer that I have found useful is one in which a common language of learning is developed around obtaining a deep understanding of a concept.

SOLO Taxonomy is a common language for learning.

SOLO Taxonomy helps both students and teachers identify ‘the what next.‘ It is based on the science of how we actually learn and is simple enough that it does not get in the way of learning. SOLO is about understanding, connecting and then extending ideas.  It  allows both teacher and student to quickly assess what stage they are at and identify what the next step is.

SOLO Taxonomy

SOLO Taxonomy via http://www.pamhook.com

Not heard of SOLO?

SOLO stands for Structured of Observed Learning Outcomes and was proposed by Australians Biggs and Collis (1982).  I will not go over what it is here but will direct you elsewhere. The best source of information on SOLO and its implementation is Pam Hook @arti_choke  via her books and website HookED. I have also benefited from reading about the experiences of others including Chris Keipert @keipertc and his blog Chemisty Chris.  Finally checkout GlobalSOLO @globalsolo for some great ideas about how SOLO is being implemented.

Biggs, J.B., and Collis, K.F. (1982) Evaluating the Quality of  Learning-the SOLO Taxonomy (1st ed) New York: Academic Press.

Comments (2)

Big History and the Future of Education Conference 2013

Big History

I have been fortunate to attend the inaugural Big History and the Future of Education Conference, organised by the Big History Institute at Macquarie University, Sydney Australia.  I knew a little of the Big History story and had been looking into the student course. If its new to you have a look at the Big History course ( Big History Project ) it’s free and be aware there is a school version and a general public version.

The Future of Education Conference

At my current school we teach an integrated year 8 Science and Geography unit called Quest. I attended the conference looking for ideas about how to better integrate learning from different KLAs and I was hoping for some insight into the pedagogy that had been applied in creating the course  as well as  the process of designing the online learning pages and activities. My questions were answered beyond  my expectations and I left with some key principles that can be applied universally in education. I also came away inspired to implement the Big History program within a school context and my head is spinning with ideas about how that might be achieved.

Principles for Integrated Learning

We need to see the “big picture” of what we are learning and as educators we can help our students by connecting learning with a narrative.  The Big History Project connects us to the narrative of the universe.  One person I meet at the conference who illuminated this point for me the most was a year 9 student I had morning tea with. She has been participating in the course at her school and her comment said it all “It gives me a reason to learn.”  The pedagogies applied need to focus on critical thinking, that is aiming beyond surface learning, evaluating evidence and making broader connections.  Learning needs to incorporate collective, collaborative learning, with students sharing and building ideas.  The Big History Project achieves many of these principles by having inquiry learning and project based learning built into the fabric of the course.  Learning needs to seek to be hands on, thought provoking, and question forming.  Here is what was outlined as the observable practices of a Big History student:

  • Frame Problems for investigations – regularly question at many scales, including the biggest.
    • Set many problems
    • Drive the learning forward with questions
  • Select and use evidence / sources 
    • Close, analytical and synoptical reading of a wide range of sources: contextualise, corroborate
    • Critical thinking “claim testing”
  • Produce accounts – use multiple large scales and big ideas from many disciplines to write;
    • Narratives
    • Casual explanation
    • Consequential explanations
    • Arguments

Principles for Designing Online Learning (Beautiful Online Learning)

The Big History course site is beautiful, but part of its beauty is that there are clear design principles at work.  The site is designed to be intuitive and easily navigated.  The site remembers that you need to see the big picture before diving into individual elements.  These principles  struck me as they were the same ideas that the team I work with at school had been discussing as we reshaped our year 8 integrated studies online learning pages.

  1. The launch pages show the big picture, it is simple and easy to navigate.
  2. There are clear learning modules, that include easily identified components, content, video, activity etc.
  3. There is a narrative that ties everything together and this is made implicit.
  4. Everything is driven forward (at every stage/level) by questions.
  5. Keeping things visually simple helps make them beautiful

Implementation of Big History in a school.

How should Big History be implemented? At this stage I will only be able to talk in ideals. Every school is different, with different cultures, daily routines, community support, personnel …. the list is endless. What is encouraging about what is present i the Big History course is the built-in flexibility and the ease with which learning can be modified for individual students.  Everything comes in a Word document that can be edited, it is designed to be adapted into different contexts and there is an active and growing community of educators contactable within the Big History course.

Ideally, I think Big History needs to be introduced as a core subject/course.  In Australia it covers a significant amount of the Australian Curriculum (in Science, History and Geography) and it would pain me if this was taught twice within the school.   As this is an integrated course, I think it should be taught collaboratively in a team teaching situation with specialist teachers from both Science and History. The best cases of implementation on display at the conference were from schools that took a collaborative teaching approach.  If we are going to break down the artificial walls that separate and compartmentalise learning into separate subjects why not take out some of the physical barriers too.  Ideally I would run this course in year 9, the outcomes currently addressed link to Stage 5 in NSW, Australia. As a solution to timetabling issues I see two classes and two teachers occupying the same (large) space.

Taking big chunks of curriculum from subjects will mean a need for reprogramming of what is left, and maybe an opportunity for some other integrated courses to be developed in the process.

Leave a Comment

Play Predict Observe Explain (PPOE)

For a while the idea of allowing students time to play and explore with equipment or other experimental setups has been an informal part of the learning in my classrooms.  One place I have been doing this since I started teaching is with microscopes. The wonder of microscopes for me has always been seeing the amazing microscopic world around us.  Yet, there is nothing more boring than a prepared slide of cork cells. While a water sample from a nearby creek or pond can keep students exploring for hours, as they chase protozoa and other microbes around a slide and in the process gain the fluency of microscopy skills required to go deeper.

More recently I have been trying to be more deliberate in designing learning that involves this element of playful experimentation.  One way I have found helps with the planning is to add an extra P (play) to the POE (predict, observe, explain) lesson sequence.

SandReaction

An example of such a lesson is the comparative reaction of  sand from Sydney beaches to that of sand from Sydney sandstone with acid (HCl). The beach sand reacts producing bubbles, while the sandstone sand doesn’t.  I gave the necessary equipment (sand and acid ) to my year 9 science class and with some basic instruction asked them to first predict what would happen and then explore with the reactions of the different sands and acid.  I then gave them microscopes to have a closer look at the sand and asked them to explain the obvious difference in reactions.  It was not until some of the students decided to carry out the reaction under the microscope that they spotted the difference between the sands.  There are obvious particles present in the beach sand that react  while there are others obviously not reacting. And at this point, with the curiosity of the students at its highest,  I stepped in with some explicit teaching of reactions between acid and carbonates (shell bits) and the lack of carbonates in Sydney sandstone.  We were studying some geology and the learning outcome  was about what we can infer about the history and formation of rocks and past environments and not so much the chemistry involved. The hands on problem solving lead to students producing a much better explanation of the differences and a much deeper understanding of the geology involved.

A final reflection is that the playing, predicting and observation do not have to be sequential and that in fact they can occur simultaneously or even in reverse order as observations can lead to new predictions and new play.

Leave a Comment

Describe a lesson that demonstrates deep learning of your students

Recently I was asked to describe a lesson that demonstrated deep learning of my students. The first thing that jumped into my mind was my Year 9 class that is full of students that ask lots of questions.questionmark

In this class the learning is often driven by the students questions, they come thick and fast and each question demonstrates plenty about what stu

dents already understand and what they want to know next. Follow up questions are often produced that take the discussion deeper into the learning.

In reflection this is my favourite part of teaching, helping students engage with their own curiosity and the production of questions that can drive learning.

I have a number of students that ask questions to the point I can no longer answer, we have to resort to looking it up, deferring to a real expert, or file it away for research projects when they are completing PhDs

What makes good questions possible in a classroom? It comes back to developing good relations with the students. You need to feel ‘safe’ to ask questions, you need to know you will not be ridiculed for asking any question. All questions need to be valued. And if the teacher knows his/her students it’s easy to provide a stimulus that is of interest to the students that provokes them to start asking questions.

Leave a Comment

Helmet Heads a PBL experience

An article, ‘Summer of hard knocks puts teens at risk‘ in the Sydney Morning Herald (SMH, 2013)  reports on the increase of injuries due to the skateboard and scooter accidents and the need to wear helmets.  The article suggests that the best way to get teens to wear helmets is for them to educate each other of the importance. The article had me reflecting on a recently completed unit on physics with my year 9 students. This unit followed on from a unit spending time developing student questions about the brain, its development and teenage decision processes.  The physics unit includes Newtons laws of motion which screams out to be understood in the light of current enthusiasm for skateboarding, scooter riding, BMX, mountain biking and stunt riding.  All of which have the potential for brain injuries. Thus in this unit (an inquiry / project based learning investigation) students were asked to apply Newtons laws of motion to helmet design and answer the question, how does a helmet protect your head?  They were guided through the running of an investigation to test a helmet they had designed.

The InvestigationHelmet Hd 2012

To model the human brain we used water filled balloons. Adding some validity other questions posed to students included: How can you make your model of the human brain as realistic as possible? What is the mass of an average human brain? How much water would need to be in the balloon?

After setting the scene with some videos on the need for helmets and the issues related to brain injuries as well as conducting an initial test dropping an unprotected water filled balloon at 1m(bounced and survived) and 2m(burst on impact) I was mostly hands off, taking on the role of co-learner. I did incorporate some direct teaching of Newtons laws as the need for them arose.  We had a couple of lessons on research and design, students had to choice building materials from a limited school supplied list (egg cartons, cotton wool, bubble wrap and ice-cream containers) or they were free to source and supply their own alternatives. The students took several different approaches to designing their helmets and we tested them in drop tests of 1m, 2m, 4m and 8m. Only a couple of ‘balloon brains’ survived 8m in their helmets.

 Some thoughts for next time.

What worked well was giving students independence to come up with their own solutions. The construction and testing were highly motivational. One issues that we did not fully resolve was how to fill the balloon to exactly the same amount in a controlled way. Also I filmed the helmet-balloon drops with the thought of analysing the motion and forces, but ran out of time to find a software solution for students to use, something I hoped to resolve over my summer vacation.

Finally after reading the newspaper article I realised that we missed an important step of any project based learning activity, that of reporting to an authentic audience. In this case their peers.

‘The only way that you can get teenagers to wear helmets is if other teenagers say it’s a good idea,” (Associate Professor Owler, quoted in SMH, 2013)

Reference

The Sydney Morning Herald (2013) Summer of hard knocks puts teens at risk. [online] Available at: http://www.smh.com.au/national/health/summer-of-hard-knocks-puts-teens-at-risk-20130112-2cmha.html [Accessed: 13 Jan 2013].

Leave a Comment

A driving question is the most important element of a PBL unit

Larmer and Mergendoller (2012) outline 8 factors of good project based learning (PBL):

  1. Significant content
  2. A Need to Know
  3. A Driving Question
  4. Student Voice and Choice
  5. 21st Century Skills
  6. Inquiry and Innovation
  7. Feedback and Revision
  8. Publicly Presented Product

While I agree all are important, I feel the most important factor in good PBL is a great driving question. If you find the right questions then most of the other factors identified are covered automatically. How do you generate a great question and who is the right person to generate that question?

The answer to who should generate the question to me is obvious? If you want students to have a voice and to have choice as well as developing a need to know about some area of content, then they should be generating their own questions. How do we help students generate a question they care about and that covers the content we as educator would like them to learn in a deep and meaningful way?

Here the answer has not always been so obvious but thanks to the work of the Right Question Institute(RQI) and their Question Formation Technique (QFT), the answer is incredibly simple and yet powerful at the same time. So far in my experience it has not failed to generate open-ended questions that cannot be answered by a simple Google search. Outlined here is how question generation was embedded at the heart of a PBL unit.

TeenBrain is a science unit aimed at year 9 students that focused on the content of the traditional control and coordination topic. The unit was divided into four parts; provocation, guiding question development, research and project creation.

The provocation was a series of short videos demonstrating how the teen brain develops from the age of approximately 12 to 25, and how the research presented explains why teenagers often make decisions without fully accounting for risk and long-term consequences. The majority of time during this unit was spent on the research and creation of an information campaign, based on a student generated guiding question.

The most important part of the process in my mind was the generation of a meaningful guiding question. To do this we guided students through the Question Formation Technique from the RQI. The QFT process takes approximately one learning session and is best done in small collaborative groups. Questions generated for research were based on the provocation and a focus question why do teens make stupid choices? As the questions generated for this task were generated by the students themselves they found them intrinsically motivating. Examples of student generated questions include; why do our brains need sleep, is there a best diet for your brain, what can you do to improve memory/learning and how does marijuana effect you brain?

Many of the ‘research’ tasks that formed the third part of this unit were traditional science lesson/experiences, that involved both student centred activities and some direct teaching of concepts, all supported by the on-line learning portal. At the end of every lesson students were ask to reflect on their own groups question and to add a couple of summary sentences relevant to their question in a shared google document. This document became students main resource when they came to designing and creating their information campaign.

Students were instructed to use the information they had collected to produce an information campaign that would influence their peers to make better decisions. Their choice in presentation media was completely open, with some of the following offered as suggestions: a video, info-graphic, poster, magazine article, ios or android app, web-page, comic-strip.  Students worked collaboratively on producing their final product and their focus was maintained by the intrinsic motivation produced from developing their own questions.

John Larmer and John R. Mergendoller, 2012, 8 Essentials for Project-Based Learning, , retrieved from http://www.bie.org/tools/freebies/8_essentials_for_project-based_learning,  Nov 2012

Comments (4)

A walk in the bush, provoking kids to think!

It’s Friday afternoon, it’s warm and it’s the last lesson of the day, and I have a restless year 9 Science class. Another teacher and I decide to take our two classes out to teach some ecology using a story. The story is a traditional dreaming story from the D’harawal people from the south of present day Sydney. It tells the story of three beautiful sisters, with golden hair and green eyes and the warrior who thought he was a ‘clever man’ who wanted to marry one of sisters. The sisters were very similar in appearance and to marry one all the warrior had to do was to find a way to tell them apart. After years of careful observation he fails, the sisters grow old and die and are rewarded for their faithful service to their people by being transformed into three different wattles which continue to provide for the people. The warrior has it revealed to him that the only difference in the three sisters was the shade of green that coloured their eyes, if only he had been more observant!   I have told this story before, with other groups, but usually I  tell the story while scratching aboriginal symbols in the dirt or sand on a bush trail, to represent the different characters of the story, and I pick leaves from different wattles as I walk and place them on my dirt picture to represent the different eyes. Today was different, the students were obviously suffering Friday afternoon, restlessness and we did a long walk to a shady spot on a rocky outcrop in the National Park, to help reduce the restlessness. With no dirt patches I resorted to getting students to act out the story as I told it.  The immediate result were the same as previous telling’s of the story; students were able to point out a number of learning outcomes for the story such as the importance of careful observation required to survive in the Australian bush, the complexity of bush land ecology and there is always a wise female student to point out the arrogance of the warrior and his need for humility. The thing that stood out on this occasion was not the different approaches to recounting the story, but the reaction of some students on the walk back to school. Having walked out further than we normally do, we had a longer walk back.  This allowed time for those students that wanted to know more to ask. I walked back with a large number of students wanting me to point out what there was to observe in the different plant communities along the track and to add as much information as I could. The questions and reflections of the students surprised me, the activity had produced far greater reflective thought than you achieve on most Friday afternoons. Months later students can still recount that afternoon, and often ask if we can get out and go for a walk, now all I need are some good stories that help explain atomic theory.

Leave a Comment

Learning using Narrative: Collaborative reflection, group feedback and individual records

This post describes the second part of an introductory lesson to our year 9 Ecology topic. It uses the technique of teaching with narrative. A description of the first part of this lesson is found here and an overview of the inspiration for using narrative teaching is found here.

In this learning session, students took part in three activities;

  • small group collaborative recount of the story,
  • retelling of the story to the whole class by each collaborative group and finally
  • personal reflection and recording.

In small groups students discussed the journey into the National Park; each member was able to build on the memories and reflections of others to help construct the whole narrative. As I wondered around the groups I was amazed at the level of recall that was present, including details I had not noticed.

The groups where then asked to present their recount to the whole class. But rather than doing this verbally they were ask to create a recount using only symbols. Some traditional symbols from aboriginal storytelling and explanations for them were given. Examples included animal tracks left behind in the dirt, the symbol for a human is also often a representation of the impression their bottom and tools would leave where they had sat on the ground, waterholes and campsites. Students were also encouraged to develop their own symbols using similar thinking process, but no words were allowed.  Each group then presented their narrative recount to the whole class.

Finally students were given time to reflect on the purpose of the narrative and record it how they saw fit in their workbooks or in a document on their digital devices.  In this case many students took digital pictures of the narrative they had produced with the symbols.

Comments (1)

Connections to the Land: Teaching Ecological Science using Narrative

Here is a description of the first lesson in our year 9 Ecology topic. It uses the technique of teaching with narrative. The lesson was split over two learning sessions. The first described here took the students on a journey into the national park that adjoins our school.

A note about context: Our school is on the Northern Beaches of Sydney, Australia. Although there are a handful of students with aboriginal heritage the majority are representative of the area, being made up mostly of both recent and early immigrants with European cultural backgrounds. Most have had little exposure to indigenous cultures.

The journey into the national park started with an acknowledgement of the traditional indigenous custodians both past and present. Students were painted up with ochre on their foreheads and hands to acknowledge respect for the people and land we were entering. They were informed that it indicated we come with in peace and with respect,  we would not travel to places we were not meant to go or touch anything we were not meant to touch. This was reinforced with a reminder that we were entering a national park and we take nothing but photos and leave nothing but footprints.

The group then made its way to a rock platform that has a permanent small creek flowing over the surface and off an overhang as a small waterfall.  Students invited to have sit on the rock and encouraged to scrunch up and role a gumleaf in their hands to release the eucalyptus oil, taking deep inhales of the oil and thus stimulate their sense of smell, an activity carried out by indigenous children to help retain memory of stories and lessons taught.  Axe grinding groves where pointed out in the creek and a description of aboriginal connection to place and the significance of fresh waters sources was explained. This was linked to our study of ecology and the interconnectedness of life.

Students were then invited to climb around and under the overhang where there are a group of ancient aboriginal stencils of hands and tools at the back of the cave. While these were being pointed out and examined by students again a further explanation of aboriginal’s connection to the land and place where emphasised as was the need for deep respect for such ancient artwork.

Finally as we returned up the hill to the school, aboriginal recognition of the significance of observational science was discussed, such as the use of plants for food and medicine and an understanding of approaching weather and rain that can be gained from observing ant behaviour.

Comments (2)

Older Posts »